The Visual Studio Code programming environment
- Summary
- We introduce program development environments and examine Visual Studio Code, the program-development environment we will use for most of this semester.
Introduction: Program-development environments
As we’ve noted previously, while the core of computer science is the design of algorithms and data structures, one needs to express those algorithms in a form understandable to the computer (and, one hopes, to human beings). We call this endeavor programming. We refer to the algorithms so expressed as both programs and code.
While it is possible to create programs in almost any text editor, more programmers develop their programs in what is normally called a program-development environment or integrated development environment (IDE). These environments not only permit you to write programs, but also provide mechanisms for testing small parts of the programs, formatting the code for easy readability, obtaining documentation, and more. In general, development environments support the other activities associated with program development.
In this course, you will use the Visual Studio Code program-development environment (“VSCode” or just “Code” for short) along with an extension to VSCode to add support for Scamper, the dialect of Scheme we use in this course. VSCode is a highly configurable, industrial-strength editor that we will configure to simplify its feature set so that it is more amendable to novices. While complicated, VSCode is also a general IDE, one of many, that you can use throughout your journey through computer science.
Obtaining VSCode
Download your copy of Visual Studio Code from https://code.visualstudio.com/. Follow the standard approach to downloading and installing software. If you encounter difficulty, ask a question on Teams.
Configuring VSCode and installing the Scamper extension
Visual Studio Code features a rich extension system which allows other developers to add functionality to the IDE. We have developed Scamper as an extension to VSCode, so that we can take advantage of the rich editing support that VSCode provides such as matching parentheses and highlighting errors.
To quickly set up VSCode, we’ve created a profile file for you to import into VSCode that will automatically configure a basic, minimal IDE with the Scamper extension for you! Download the following profile file to your machine:
To load this file, open Visual Studio Code and access the Command Palette which allows you interact with Code in a command-based style. To access the Command Palette, use either:
- The toolbar menu at the top of the Code window: View → Command Palette…
- The Command Palette shortcut:
ctrl+pon Windows or⌘+pon Mac.
Enter the following command into the Command Palette:
> Settings profile: import...
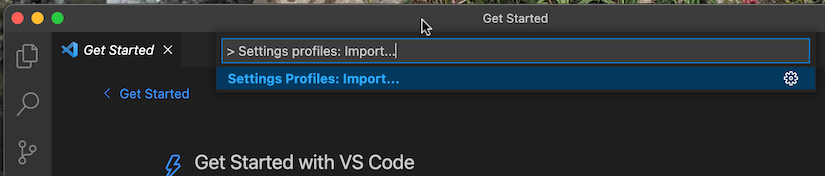
(Note the greater-than sign at the start of the line!)
When prompted, allow Code to overwrite your settings, select “Import from profile file”, and load the csc151-code.profile file you downloaded.
Once the profile has finished loading, you should see a squirrel icon in the left-hand sidebar.
This means that the Scamper extension has been loaded and you are now good to go!
An overview of Visual Studio Code
When you start VSCode, you will find that VSCode is similar to most applications. For example, it has a File menu that lets you open and save files and an Edit menu that permits you to cut, copy, and paste text. After loading the configuration file in the previous step, your instance of Code should look like the screenshot below. (Note that contents of the primary window may be different—that’s ok!)

Code has several sidebars, panels, and menus that you can use to access its functionality. Ultimately, we open up individual source code files and edit them much like we would edit a textual document in a program like Microsoft Word or Google Docs. First, we must point VSCode at a folder on our computer. Do this by clicking the file icon in the left-hand sidebar. This is normally the top icon in the sidebar. This will open the explorer sidebar where you can manage your files through Code.
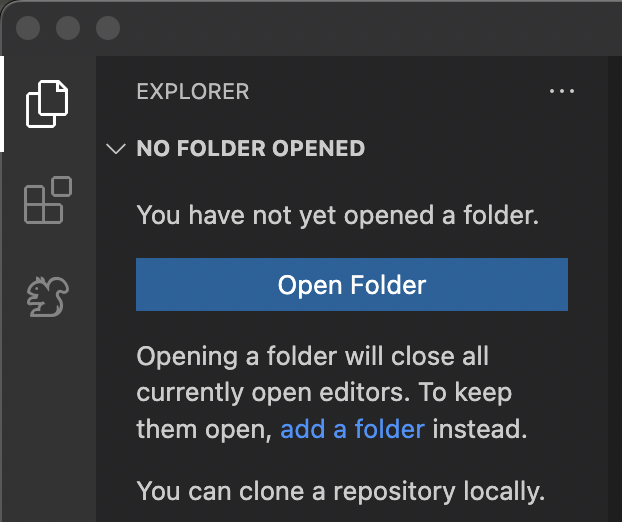
VSCode relies on you to pick a folder where it will base all of its operations. Code will treat this folder like a single project, a collection of source code files that are all related, e.g., because they are part of a single complete program. In this course, you’ll maintain a single folder that will contain all of your work.
Create a folder somewhere memorable on your computer, for example, a folder
named csc151 in your Documents folder of your home directory. It ultimately
does not matter what you name the folder or where you place it as long as
it is accessible. Then, open the folder in VSCode through the explorer sidebar.
After doing so, the explorer panel will change to reflect that VSCode is
monitoring the directory you chose. If you made a new directory as recommended,
there will be no files in it, so the panel will not contain any entries.
Regardless, we’ll create a new Scheme source file to edit. Click the new file icon in the explorer panel (the file icon with a ‘+’):
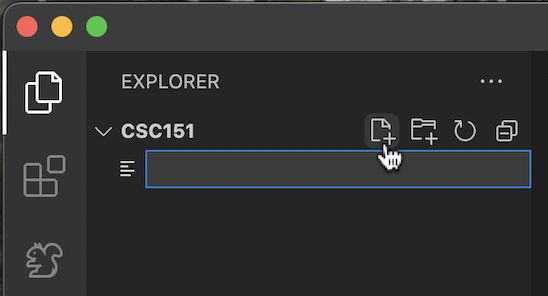
Clicking the new file icon will create a new entry in the Explorer panel for the
file you intend to create. You can then enter the name of the new file.
Visual Studio Code knows what programming language you intend on using based on
the file extension you give your source files. For Scamper, we need to name
our files with a .scm (shorthand for “Scheme”) extension to enable
Scamper-editing mode. Name your file intro-scamper.scm.
You can then click on the created file in the file explorer to open it. After
doing so, you will be greeted with a blank file in the main VSCode window. If
your file has a .scm extension (and it should because we named the file
intro-scamper.scm!), you will see two icons in the right-hand corner of the
main window: a play button and a debug button. If you see these things,
congratulations, you are ready to write some code!
Getting started with Scheme
Scheme has a fairly simple syntax, but one that is different than most other programming languages. Parentheses play an important role in Scheme. To tell the computer to apply a procedure to some arguments in scheme, you write an open (left) parenthesis, the name of the procedure, the arguments separated by spaces, and a close (right) parenthesis. For example, here’s how you would add 1, 2, and 3.
(+ 1 2 3)
Try typing this into your file. You can then immediately run the program by
clicking on the green play button. This will open a new panel, the output
panel, to display the output of your program. If everything is correct, the output
panel should say 6 because 1 + 2 + 3 = 6!

The output and exploration panels
While you can run your program easily in VSCode, you will likely find yourself needing to see how your program ran step-by-step to crystallize your understanding of how the program operates or if you need to diagnose an issue, called a bug, in your program. If you click on the bug icon instead of the play icon, you will open Scamper’s program exploration view which will allow you to interactively run your source code step-by-step.
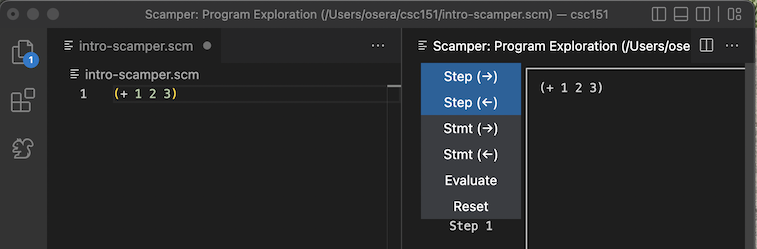
The various buttons in the window will allow you to control the execution of your program at different levels:
Step →: steps the next sub-expression to evaluate one step forward. This is the smallest “unit” of execution in our Scheme programs.Step ←: reverts the last step taken by the Scheme program.Stmt →: completely evaluates the next statement to be executed by the computer.Stmt ←: reverts the last statement that was executed by the program.Evaluate: completely evaluates the entire program, identical to clicking the play button.Reset: completely unwinds execution of the program back to the start.
We’ll explain what an “expression” and a “statement” are in our next reading.
For now, you can use the Step buttons to move back and forth in your
program’s execution.
An important additional feature of the exploration panel is the ability to add statements on-the-fly. This is useful because we frequently want to quickly try out a program snippet in order to explore the behavior of our program without resetting the exploration window. This functionality is found in the “Add Statements” textbox at the bottom of the program exploration view. Note that you will likely need to scroll within the panel to view this box!
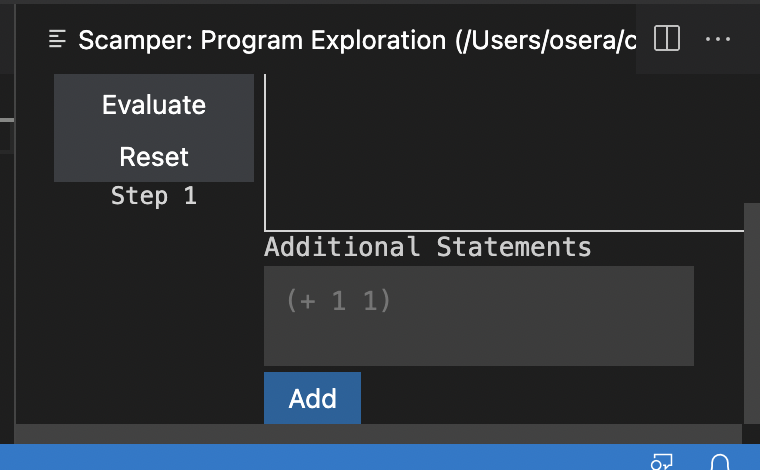
You can type additional statements into this box and then they are added to the bottom of your program, waiting to be evaluated like the other statements of your program. Note that since statements are frequently used as tests or one-offs and are not actually part of the program you are writing. Consequently, they are not saved to the file your are editing.
Here are a few examples of additional statements to try out, including a few that show off a variety of Scheme numeric operations. You may be able to figure out the meaning from context.
> (+ 1 2 3)
6
> (sqrt 144)
12
> (floor 3.5)
3.0
> (ceiling 3.5)
4.0
> (expt 2 3)
8
> (expt 3 2)
9
> (string-length "All mimsy were the borogoves")
28
> (string-split "All mimsy were the borogoves" " ")
(list "All" "mimsy" "were" "the" "borogoves")
In our readings, we will frequently use this style of code listing to describe an individual code snippet and its output. The code snippet that you can write in your source file or the explorations window is preceded by a greater-than sign, called the prompt and the line following it (without a greater-than sign) is the output of that snippet.
This style of interaction may feel a bit like a calculator with a strange user interface and a log of what you’ve done. And, in some sense, that’s one purpose of Scamper’s exploration panel. However, Scheme and Scamper also provides a variety of features that may not be easily available in most calculators, such as support for values other than numbers (e.g., the strings above), the ability to name values, and the capability for you to write your own operations (aka procedures).
Here’s a quick example of naming in Scheme, which we do with the define
keyword.
> (define add +)
> (add 1 2 3)
6
> (define three 3)
> (sqrt three)
1.7320508075688772
> (add three three)
6
The code-editing panel
The output and explorations panel allow us to examine the results of the programs we write and we should use them as much as possible. However, any “real” code that we should write should be entered into our file via the main code editing panel.
In Scheme, our programs are a collection of definitions introduced with the define keyword.
As we will see in later readings, using define to introduce new named definitions is a powerful way to make our code elegant and coherent.
In particular, a name hopefully tell you what something does without you having to understand exactly how it works.
Consider the following definition and uses of that definition below it.
Try adding it to your intro-scamper.scm file:
(import image)

(define drawing
  (beside
    (circle 50 "solid" "red")
    (circle 50 "outline" "green")
    (circle 50 "solid" "blue")))

drawing

(above
  (rectangle 50 20 "outline" "purple")
  drawing
  (rectangle 50 20 "outline" "purple"))
Can you predict what the last two statements will produce? Make a guess and then use the program output and/or explorations window to check your answers. Note how proper choices of names allow us to understand how our programs work even without know how their internals work!
Self Checks
You have now learned enough to interact with VSCode and Scamper. In the forthcoming lab, you will have the opportunity to ground those abstract instructions in concrete exercises. Before you do so, you will find it useful to take a few quick notes on some issues.
Check 1: What is Visual Studio Code?
In your own words, explain what VSCode is and why we use it in this course.
Check 2: File suffixes
What suffix should you use for your Scheme files?