Mini-Project 3 : Beat Machine
A staple of electronic music is the drum machine. A drum machine allows the user to create patterns of drum beats from a set of sound samples imitating real-world percussive instruments such as a snare drum or a cymbal. They can be found all over modern popular music, e.g., dance pop and electronic music from the 80s and 90s:
- Phil Collin’s In the Air Tonight uses a Roland CR-78.
- Michael Jackson’s Man in The Mirror uses a Linn 9000
- Aphex Twin’s Heliosphan uses a Roland TR-909.
In this mini-project, we will use our fundamental programming skills to build a library of functions for constructing and manipulating drum beats. We’ll use these functions to then explore some classic rhythmic patterns not just from western music, but also other traditions!
Deliverables
For this mini-project, you will submit one file, beat-machine.scm, that contains all of your work.
Make sure your file begins with the following header, filling in the shout-case portions of the header with your information.
;; CSC-151-NN (TERM)
;; Mini-Project 3: Beat Machine
;; YOUR NAME HERE
;; YYYY-MM-DD
;; ACKNOWLEDGEMENTS:
;;   ....

(import music)
Preliminaries
Rhythm in Music
Before we begin, let us first introduce some fundamental concepts in specifying rhythm in music. If you are familiar with basic musical rhythmic notation from studying a musical instrument, you are likely good to go! If you have not seen musical notation before, don’t worry, this primer on rhythm and meter will get you started:
(The really useful information begind around Example 1-6.)
Importantly, we will be using musical notation only to more concisely express the patterns we will be implementing in this mini-project. We’ll also accompany these patterns with prose descriptions. If you need help translating a piece of musical notation found in this mini-project, just let a mentor or instructor know!
Modifying Compositions
In some recent labs, we explored the music library for generating musical compositions.
Here, we will focus on the music library’s capabilities for more expressive music via its mod function.
Consider this simple musical composition consisting of four quarter notes. (The pitch is a C, fourth octave, i.e., a C4, but don’t worry, since we’re working with percussion in this mini-project, the pitch won’t matter!)
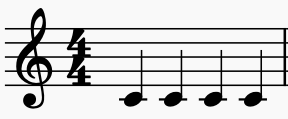
We can realize this in Scamper by playing four quarter notes in sequence with seq.
(Note that the MIDI note value for a C4 is 60).
(import music)

(define cs
  (seq (note 60 qn)
       (note 60 qn)
       (note 60 qn)
       (note 60 qn)))

cs
This is a pretty boring passage!
We can spice it up by modifying the composition with the mod function.
(mod m comp) creates a composition comp but modified with modification m.
Two examples of modifications are:
(tempo beat bpm)modifies the composition by playing it atbpmbeats per minute relative tobeat.beatmust be a duration, e.g.,qnfor quarter note, andbpmmust be a non-negative number.(dynamics d)modifies the composition by playing it at volume leveld.dmust be an integer in the range0 ≤ d ≤ 127.
By default, compositions are played with a bpm of 120 and a dynamics level of 64, i.e., “50% volume.”
Here are examples of modifying our simple sequence of Cs with these modifications:
(import music)

(define cs
  (seq (note 60 qn)
       (note 60 qn)
       (note 60 qn)
       (note 60 qn)))

cs

(mod (tempo qn 180) cs)

(mod (dynamics 32) cs)

(mod (tempo qn 180)
  (mod (dynamics 32)
    cs))
You should observe that the first two modifications make the sequence faster and quieter. The final modification combines the two previous modifications.
The final modification we’ll introduce in this mini-project is the percussion modification.
This one is special: rather than changing the musical content of the passage, percussion changes how Scamper interprets notes according to the General MIDI (GM) specification.
In the General MIDI standard, when the MIDI instrument is in “percussion mode” (sending messages to channel 10), the instrument produces percussion sounds when given particular MIDI notes according to the following table:
For example, from the table we can see that MIDI note 60 is a “High Bongo,” so when we apply the percussion mod to our sequence, we get a sequence of four high bongo strikes instead of middle C from a piano!
(import music)

(define cs
  (seq (note 60 qn)
       (note 60 qn)
       (note 60 qn)
       (note 60 qn)))

cs

(mod percussion cs)
Part 1: Percussive Dynamics
For this first part of the mini-project, we’ll exclusively use the snare drum voice, corresponding to MIDI note 38. On its own, basic drum beats are rather boring.
(import music)

(mod percussion
  (seq (note 38 qn)
       (note 38 qn)
       (note 38 qn)
       (note 38 qn)))
Most percussive instruments do not have a (easily controlled) pitch and due to their nature, their notes do not sustain. Where we lack in pitch and sustain, percussionists must make up in dynamics and volume! In addition to notes played at a regular volume, percussionists also play two other kinds of notes:
- Accented notes where the note is played louder than the notes around it.
- Ghost notes where the note is played quieter than the notes around it.
Write a pair of functions to capture this style of play:
-
(accent midi-note dur)takes amidi-notevalue and durationduras input and plays that note it with an accent, i.e., at a louder volume. In musical notation, we typically notate an accented note with a>symbol below the note: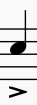
-
(ghost midi-note dur)takes amidi-notevalue and durationduras input and plays that note as a ghost note, i.e., at a quieter volume. In musical notation, we typically notate a ghost note by surrounding it in parentheses:
Recalling that the default dynamics level is 64 out of a total of 127, pick appropriate values for accent and ghost so that the resulting notes louder and significantly softer than a regular note.
In particular, ghost notes are often said to have the property of being “felt, not heard,” so keep them quiet!
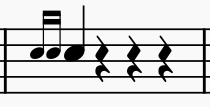
With accent and ghost implemented, define a composition called strokes that consists of two bars of snare drum quarter notes.
Each of these bars consists of four snare drum quarter notes: an accented note, two ghost notes, and a regular note, in sequence.
This pattern is typically taught to beginning drummers as a way to develop different strokes, e.g., bounce, tap, and upstrokes.

Next, let’s focus on rolls. Rolls are the way that percussionists get “duration” out of their notes. One way to express the idea of the roll is via tremolo notation. With tremolo notation, we split up a note into a collection of evenly spaced notes that fit the duration of the original note.
For example, a quarter note notated with:
- A single tremolo slash really means two eighth notes, i.e., divide the note quarter into two parts.
- A double tremolo slash really means four sixteenth notes, i.e., divide the quarter note into four parts.
- A triple tremolo slash really means eight thirty-second notes, i.e., divide the quarter note into eight parts.

In other words, each tremolo slash causes the collection of notes to be divided in half. With this in mind, write a function that captures the notion of a tremolo note:
(tremolo slashes midi-note dur)takes amidi-notevalue, durationduras input and the number of tremolo slashesslashesas input. It returns a sequence of evenly spaced notes of the specified value that fit intodur.
For this function, you will find that you will need to perform fractional arithmetic on dur.
The numerator and denominator functions will be helpful in performing this arithmetic.
Furthermore, you will also find the (repeat n comp) function useful which plays composition comp in sequence n times.
(Note: the resolution of the timer we use for MIDI playback isn’t super precise. So do not expect any notes shorter in duration than thirty-second notes to sound accurate!)
Finally, it is common for percussionists to add flourishes in the form of grace notes to their playing. Grace notes are notes that are played before a note, but do not contribute to the duration of the overall note.
Because grace notes muck with the timing of the composition in a non-trivial way, the music library has a function for creating a grace note directly:
(pickup c1 c2) creates a composition composed of composition c2 preceded by c1.
However, c1 is played immediately before c2 and does not contribute to the overall duration of the composition.
Finally, to conclude this part of the mini-project, let’s put these primitives to work and implement some of the fancier drumming rudiments out there. Write the following functions:
-
(roll midi-note dur): creates a roll of the given durationdurby subdividingdurinto four equally-spaced notes. (This corresponds to a double-stroke roll where each stroke bounces twice for a total of four strokes between both hands.)
-
(flam midi-note dur): creates a flam which is a grace note of half the duration played before the given note. The given note is also played with an accent. Remember to use thepickupfunction to create the grace note.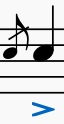
-
(single-drag-tap midi-note): creates a single drag tap which (in its eighth note version) is a pair of sixteenth note grace notes, followed by a regular eighth note, and then finally an accented eighth note. Again remember to use thepickupfunction.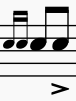
Part 2: An Example Groove
In addition to dynamics, we can also add other percussive instruments to add variety to our patterns. In many musical genres, this takes the form of a drum kit, a collection of percussion instruments played by one person. Commonly, the drum kit contains:
- A snare drum,
- A hi-hat cymbal,
- A bass drum, and
- Various assortments of additional cymbals and toms.
For simplicity’s sake, we’ll assume that our drum kit contains just the first three instruments: a snare, hi-hat, and bass drum. In a band, drummers will keep time by playing a pattern on the kit. For example, let’s consider a simple rock beat over a single measure of a song. Commonly, songs will be in “4/4” or common time where:
- The quarter note gets the unit pulse.
- There are four unit pulses, or beats, per measure.
The rock beat over a single measure looks as follows. The drummer will:
- Hit the high-hat on all four beats, i.e., 1, 2, 3, and 4.
- Hit the bass drum on beats 1 and 3.
- Hit the snare drum on beats 2 and 4.
In musical notation, we would present this pattern as follows:

The notes on the page no longer represent different pitches, but instead different voices on the drum kit.
- The bass drum is the low note (low F if we interpret the note as a pitch with a treble clef).
- The snare drum is the middle note (C when interpreted as a pitch).
- The hit-hat is the top note with an
xfor the note head (pitch G).
We can see that in terms of musical notation, the beats are aligned against each pulse.
- On pulse 1: the hi-hat and bass drum play.
- On pulse 2: the hi-hat and snare play.
- On pulse 3: the hi-hat and bass drum play.
- On pulse 4: the hi-hat and snare play.
Note that we’ve now decomposed our pattern in two different ways!
- In the first case, we horizontally sliced the pattern by identifying how each instrument or voice plays.
- In the second case, we vertically sliced the pattern by identifying what voices occur on each pulse.
With this in mind, write a pair of definitions:
horizontal-simple-rock-beatvertical-simple-rock-beat
That implement this pattern using these two different decompositions. When you are done, both beats should sound like this (minus the stick flipping):
Part 3: Slicing up the Beats
Now, let’s turn our attention towards building our beat machine which will emulate how a drum machine works. Drum machines allow an operate to program in a percussion pattern by specifying the pattern of beats for each voice that the machine supports. As an example of a drum machine, feel free to play with this Roland TR-909 emulator to get a feel for how it works.
We can generalize what we observed in the previous part to arrive at two different implementations of our drum machine. We can decompose the pattern either:
- Horizontally by its component voices, e.g., the hi-hat part versus the bass drum part.
- Vertically by its component pulses, e.g., what is played on pulse 1, pulse 2, etc.
While the effect of the decomposition does not matter, our choice of decomposition will heavily influence not just our implementation but also the inputs the user must provide to our beat machines!
Write two functions that capture this “horizontal” and “vertical” approach to generating beats:
(horizontal-beat-machine voices)takes a list of compositions as input that represent each of thevoicesof the pattern.(vertical-beat-machine pulses duration)takes a list ofpulsesas input. Each “pulse” itself is a list of MIDI values corresponding to the voices played on that pulse.durationis the length of each pulse specified as adurvalue. In this implementation, you should ignore any accents and ghost effects for a given note.
horizontal-beat-machine and vertical-beat-machine should generalize horizontal-simple-rock-beat and vertical-simple-rock-beat from the previous part.
Demonstrate this by rewriting horizontal-simple-rock-beat and vertical-simple-rock-beat to use the appropriate beat-machine implementation.
Finally, further exercise your implementation by implementing this new groove in two ways: one with your horizontal machine and the other with your vertical machine:
-
elaborate-rock-beat, i.e.,horizontal-elaborate-rock-beatandvertical-elaborate-rock-beat:
- Hi-hat plays steady eighth notes.
- Snare plays steady ghost notes, except beats 2 and 4 are accented notes.
- Bass drums plays two eighth notes, rests for an eighth note, plays an eighth note, and then rests until the last possible eighth note of the measure and plays it. Note that we typically denote the eighth notes between beats as the “ands” of the preceding beat, so a more concise way to describe the bass drum pattern is: “play one-‘and’, the ‘and’ of two, and the ‘and’ of four.”
- Remember to look for the ‘implied rests’ when reading the music.
Part 4: Exploring Grooves
With your beat machines defined, let’s try it out on a number of grooves.
For each of the following grooves, define them in terms of your beat-machine functions, prefixing each definition with horizontal- and vertical- to indicate which beat-machine function you used.
Helpful Tip: You should consider carefully counting out the beats for each voice before you begin writing the code for these grooves. We would even suggest drawing the grooves and adding notation to indicate where each beat (1,2,3,4) falls in the measure. Also remember to watch for ‘implied rests’ for each voice, recalling that each measure below should have exactly 1 total duration split into 4 quarter note beats. It may help to explicitly add those rests to your drawing.
-
latin-beat: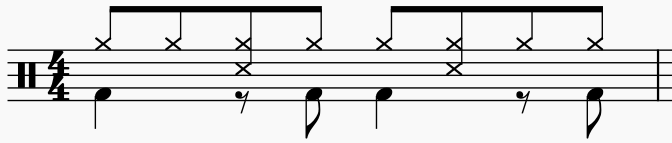
- The bass drum plays on 1, the “and” of 2, 3, and the “and” of 4.
- The snare drum plays on 2 and the “and” of 3. (Use the “side stick” percussion voice instead of the snare drum to get the correct sound!)
- The hi-hat plays eighth notes for the entire bar.
-
swing-beat:
- The bass drum plays quarter notes for the entire bar.
- The snare drum plays on 2 and 4.
- The hi hat plays on 1 and 3. On beats 2 and 4, we divide up the beat into three equal parts, a triplet, and the hi-hat plays on the first part and the third part of the triplet.
-
funk-beat:Here, our funk beat divides up the beat into 4 equal parts, resulting in sixteenth notes. We pronounce the four sixteenth of a beats as: “one,” “ee,” “and,” “ah.”

- The bass drum plays on 1 “and”, the “ah” of 3, and the “and” of 4.
- The snare drum plays an accented note on 2 and 4 and plays ghost notes on the “ah” of 2, the “ee” and “and” of 3, and the “ah” of 4.
- The hi-hat plays eighth notes for the entire bar.
-
garba-beat(credit to Sarah Thawyer, via Drumeo’s Exploring Indian Grooves course):
This particular beat is inspired by the Garba, a form of Indian folk dance.
- The bass drum plays on 1, 2, and 3 of the measure.
- The snare drum plays on the “and” of 1 and 2. In the third beat of the measure, it gets tricky! Breaking up the third beat into eight thirty-second notes, the snare is played on the 4th and 7th of those notes. Finally, the snare also plays on the “and” of 4.
- The hi-hat plays only on 4. Breaking up the beat into 2 eighth notes, the hi-hat plays three evenly-spaced notes (eighth note triplets) on 4. (Use the “Hi-mid Tom” percussion voice instead of the hi-hat to get the correct sound!)
For the
garba-beat, you will find that you can probably only implement it using yourhorizontal-beat-machine. You should attempt to implement it usingvertical-beat-machineas the final part of this exercise will ask you to reflect on your implementations and any difficulty you had using them.
Finally, in addition to these four beats, come up with one additional beat of your own! Your beat should use at least two of the helper functions you developed in part 1. Otherwise, simply have fun with it! Here are some starting points for inspiration:
- Try taking one of the beats you wrote and add to it! For example, you might start by taking the hi-hat and playing sixteenth notes to give more of a hurried feel to the groove.
- Experiment with the tempo via the
(tempo beat dur)modification! - Search the Internet for “drum grooves” or “drum beats” and find music notation for a particular groove in a genre of music that you like!
Make sure to define your beat and implement it using your beat-machine implementations.
You may only provide one implementation of your groove, choosing either the horizontal or vertical version of the machine as you see fit.
Part 5: Reflection
Finally, after you are done, in a comment at the bottom of your file, answer the following questions about your work, in a few sentences per question.
a. Overall, which implementation of beat machine did you find easier to use to implement the various grooves in this mini-project?
Which implementation of beat machine did you choose for your final groove?
Explain why!
b. Look back at the Roland TR-909 emulator linked in part 3.
Additionally, look at this drum machine implementation by @berkcebi.
Which way do these drum machines that are emulators of or inspired by physical drum machines slice up a groove?
Based on your experience, why do you think physical drum machines are set up this way?
c. Finally, recall that our vertical-beat-machine ignored modifications of notes, e.g., ghosts and accents!
Describe briefly how you might fix vertical-beat-machine to allow for ghosts and accents and comment on the negatives of your approach.
(_Hint_: there are two ways to fix `vertical-beat-machine`.
One of them adds undesirable redundancy to our code; the other makes the set up for `vertical-beat-machine` much more complex!)
This reflection highlights an important takeaway: the design of an user interface, whether a physical or software interface, is an exciting area of computer science that intersects with artistic design and psychology. There is no “right” way to design an interface, just ways that may make more sense for a particular context.
Turning in Your Work
When you are done, your beat-machine.scm file should contain the following definitions:
- Part 1:
accentghosttremolorollflamsingle-drag-tap
- Part 2:
horizontal-simple-rock-beatvertical-simple-rock-beat
- Part 3:
horizontal-beat-machineandvertical-beat-machine.horizontal-elaborate-rock-beatandvertical-elaborate-rock-beat.
- Part 4:
horizontal-andvertical-versions of:latin-beatswing-beatfunk-beatgarba-beat
- (Your own beat with its own
define)
- Part 5:
- (Short answers to prompts in comments)
Make sure you add appropriate documentation for each of your definitions and that you have ensured that your program runs without errors. Also make sure that after you submit to Gradescope that the autograder reports that everything ran successfully.